How to upcycle a telephone table with seat
25 June 2018

We've been working with Cassiefairy, full time blogger and magazine writer, for a few months now. We've been challenging her to upcycle items that you may find in one of our storage units. We get so excited in the office when the photos and projects come through. She never ceases to amaze us with her talent and creativity. She has completely transformed this derelict phone table into a thing of beauty with wood effect vinyl and flexible spray paint.
.jpg.aspx "Marquetry-upcycling-project-Before-(2).jpg")
A Step-by-step guide to faux wood marquetry
If you’ve got an old piece of wooden furniture that’s seen better days, consider giving it a quick and easy makeover before you bin it. It’s not just chalk paint that can transform a unit; using self-adhesive vinyl can cover imperfections and add colour to cabinets. The great thing about using sticky vinyl is that you can keep the original wood effect of your furniture, thanks to the modern versions of adhesive vinyl with wood-grain texture on the surface.If you’d like to add a traditional finish to a much-loved piece of furniture you can use wood grain vinyl in a selection of shades and cut out marquetry-style shapes. Opt for geometric and graphic shapes for a mid-century style piece, such as this retro telephone table, or go for a more ornate pattern to create an Arts and Crafts style inlaid table top. You can use this effect on drawer fronts, bedside tables, storage cabinets and wooden ottomans – or you can be even more adventurous with a larger project and tackle a plain wooden headboard or wardrobe doors.
.jpg.aspx "Marquetry-upcycling-project-Finished-Photos-(1).jpg") You will need:
You will need:
- Screwdriver
- Sandpaper
- Scissors
- Ruler
- Spray paint – We used Rust-Oleum’s “Direct to Vinyl” in Black
- Self-Adhesive wood effect vinyl – The colours used in this project include: Birch, Beech, Wild Oak, Oak Truffle and Oak Umbra from VinylWarehouse.co.uk
- Craft knife and cutting mat, or a cutting machine
Step 1
 Carefully dismantle the piece of furniture that you’re renovating so that you can easily decorate the surface. Sand down any rough edges and thoroughly clean until no traces of dust remain. The tiniest grain of grit will create a bump in the vinyl surface, so this is an important step to get a smooth finish.
Step 2
 Spray paint any parts of the unit that you’re not going to be covering in vinyl. This includes the legs, trim and handles. In this instance, we used direct-to-vinyl paint from Rust-Oluem to give the black vinyl seat and trim a quick refresh and bring back its original shine.
Step 3
 Cut a sheet of self-adhesive vinyl in a matching (or contrasting) colour slightly larger than the surface of the table or drawer fronts. This full sheet of vinyl will refresh the surface and make it easier to apply the marquetry shapes. Remove the backing paper and apply to the surface, starting in the centre and gently smoothing outwards to ease out any air bubbles as you apply the vinyl.
Step 4
.jpg.aspx "Marquetry-upcycling-project-(4).jpg")
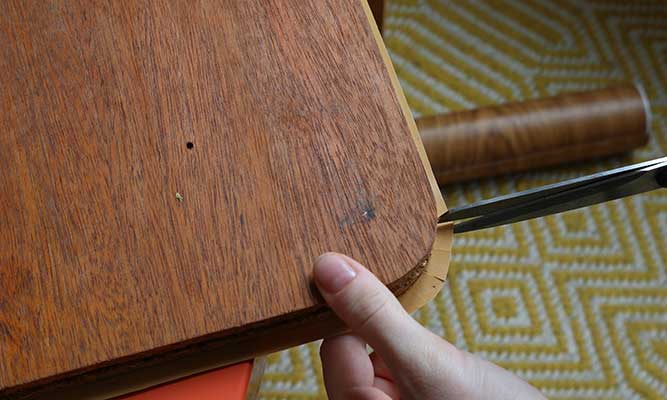
When you reach the edges, use a pair of scissors to make a few small cuts around the corners and then fold the vinyl over the edges and onto the back of the piece of wood. If you’ve removed a trim you can glue it back into place around the edges at this point.
Step 5
.jpg.aspx "Marquetry-upcycling-project-(5).jpg") Draw out a design on paper to create a template for the marquetry. Add triangles, diamonds, circles or any other shapes you like until you have a design that covers the centre of the table top or drawer fronts. We added a telephone shape in the centre to reflect the original use of this table. Use different coloured pencils to work out where to position the different colours of vinyl and try to ensure that each adjacent shape is a different shade of wood.
Draw out a design on paper to create a template for the marquetry. Add triangles, diamonds, circles or any other shapes you like until you have a design that covers the centre of the table top or drawer fronts. We added a telephone shape in the centre to reflect the original use of this table. Use different coloured pencils to work out where to position the different colours of vinyl and try to ensure that each adjacent shape is a different shade of wood.Step 6
.jpg.aspx "Marquetry-upcycling-project-(6).jpg") Cut out the marquetry shapes from the self-adhesive vinyl. You can either trace around your template onto the paper back of the vinyl and then cut out with a craft knife or scissors, or you can program the shapes into a cutting machine. When cutting, try to ensure that the wood grain goes in the same direction on all the shapes to match the direction of the wood grain you applied to the table.
Cut out the marquetry shapes from the self-adhesive vinyl. You can either trace around your template onto the paper back of the vinyl and then cut out with a craft knife or scissors, or you can program the shapes into a cutting machine. When cutting, try to ensure that the wood grain goes in the same direction on all the shapes to match the direction of the wood grain you applied to the table.Step 7
.jpg.aspx "Marquetry-upcycling-project-(7).jpg") Measure the centre point of the table and position your central shape. Remove the backing paper and stick down, smoothing out any air bubbles from the middle. Work around your design, adding different shapes and colours. You can use the base layer of vinyl that you covered the table with by leaving parts of the design ‘empty’ – in this instance, the area around the telephone is the table surface rather than a stuck-on shape.
Measure the centre point of the table and position your central shape. Remove the backing paper and stick down, smoothing out any air bubbles from the middle. Work around your design, adding different shapes and colours. You can use the base layer of vinyl that you covered the table with by leaving parts of the design ‘empty’ – in this instance, the area around the telephone is the table surface rather than a stuck-on shape.Step 8
.jpg.aspx "Marquetry-upcycling-project-(3).jpg") Use a ruler to ensure that your shapes are in line with each other. Don’t worry if you stick a shape in the wrong place, you can easily peel it back off and re-position it. You can also use the area you cut away from a shape as a template to position other parts of the design. We stuck on the telephone shape and then used the rest of the backing paper to mask off the surrounding area and indicate where to add the outer circle.
Use a ruler to ensure that your shapes are in line with each other. Don’t worry if you stick a shape in the wrong place, you can easily peel it back off and re-position it. You can also use the area you cut away from a shape as a template to position other parts of the design. We stuck on the telephone shape and then used the rest of the backing paper to mask off the surrounding area and indicate where to add the outer circle.Step 9
.jpg.aspx "Marquetry-upcycling-project-(9).jpg") When you have finished adding your design to the table or drawer fronts, give them a final smoothing down with your fingertips. You can then reassemble the piece of furniture and step back to admire your handiwork!
When you have finished adding your design to the table or drawer fronts, give them a final smoothing down with your fingertips. You can then reassemble the piece of furniture and step back to admire your handiwork!.jpg.aspx "Marquetry-upcycling-project-Finished-Photos-(9).jpg") You can use this technique to decorate a desk, storage box or even create framed artworks. Any design you can think of can be cut from self-adhesive vinyl and layered onto any smooth surface. Ensuring the wood grain runs in the same direction looks very neat, but you can create a contrasting effect by cutting shapes on an angle across the wood grain if you prefer.
You can use this technique to decorate a desk, storage box or even create framed artworks. Any design you can think of can be cut from self-adhesive vinyl and layered onto any smooth surface. Ensuring the wood grain runs in the same direction looks very neat, but you can create a contrasting effect by cutting shapes on an angle across the wood grain if you prefer.Even if you don’t want to add a marquetry design, simply covering a piece of furniture with a single sheet of self-adhesive wood grain vinyl will refresh even the most faded or stained unit and give it a new lease of life. Let us know if you try out this technique for yourself, we’d love to hear how you get on.
*****
Discover more upcycling articles on Safestore’s blog where you may find inspiration. Or, if you’re looking to store some items which you may want to upcycle in future we have a range of self storage options in nearly 120 locations – find your nearest store for a quote today.
A Step-by-step guide to faux wood marquetry