Building shelters is a very basic human instinct, forged in our DNA as far back as the Stone Age, and perhaps it’s that instinct that makes building a cardboard box house so appealing to children. As parents, a cardboard box represents a few hours of free entertainment and quality time with our children, so this is a win-win activity!
We’ve put together some instructions on how to make a cardboard house with suggested measurements, but you can adapt these measurements according to the size of cardboard you have available. If you don’t have enough cardboard to make a child-sized cardboard house, you could always make a cardboard house for their toys or a pet.
You might have found this page after a search because you’ve got some cardboard you want to repurpose (perhaps from a delivery of flatpack furniture or a major online purchase), but if you don’t already have some, you can find
free cardboard boxes easily enough.
How to make a simple cardboard box house
You’ll need:
- Cardboard
- Craft knife or sharp scissors
- Packaging tape
- Pencil
- Ruler or long piece of cardboard to use as a straightedge for drawing
- Tape measure
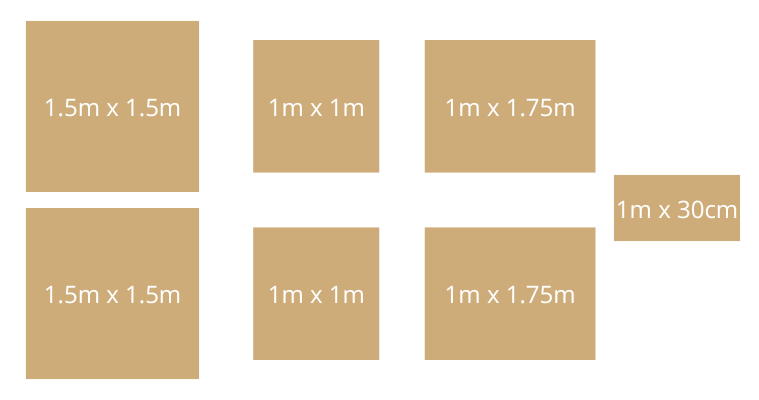
1. Measure and cut out:
- 2 square pieces of cardboard, each measuring 1.5m x 1.5m (for the front and back)
- 2 square pieces of cardboard, each measuring 1m x 1m (for the two sides)
- 2 rectangular pieces of cardboard, each measuring 1m x 1.75m (for the roof)
- 1 rectangular piece of cardboard measuring 1m x 30cm (to make the apex of the roof)
2. Take one of the largest pieces of cardboard and
mark it “F” (for Front); then
mark one side”L” for left, and the opposite side
“R” for right. Mark the remaining two sides
“T” for top and “Bo” for bottom.
3. Do the same with the other largest piece of cardboard, marking this one
“Ba” for Back and labelling the two sides, top and bottom.
.png.aspx?width=400&height=400)
4. For both the front and back pieces:
a. Find and
mark the very middle of the Top edge.
b. Measure and
mark a point on the Left and Right sides 1m from the Bottom edge.
c.
Draw a straight line from the middle of the Top edge to the mark made on the Right side, and another straight line from the middle of the Top edge to the mark made on the Left side.
d.
Cut along the lines you’ve drawn and discard the excess cardboard.
You should now have a Front and a Back piece, each shaped like this:
.png.aspx)
5. Before constructing the cardboard house,
draw and cut out windows and a door, wherever your child wants them, and spend some time decorating all of the pieces.
a. To make a door or window that can open and close, cut along three of the edges and just score the fourth (on one side or the other) so that it will fold open and closed cleanly.
b. You can paint the house your child’s chosen colours (using old wall paint you might have left over from decorating, or acrylic paint), or decorate it using wallpaper samples from your local DIY store. You can add details such as roof tiles and bricks, and help your child to decorate the inside walls and ceiling. If you’re making a cardboard box house with rooms (see below), decorate each room differently.
6. Once your child is happy with the decoration, you can
construct your cardboard box house:
a. Lay the Back piece on the floor with the bottom edge closest to you, interior decor facing up (so that the exterior/brick face of the Back panel is touching the floor).
b. Lay the Left side panel to the left (interior decor face up), lined up with the Left edge of the Back piece, and the Right side panel to the right (interior decor face up), lined up with the Right edge of the Back piece. Firmly apply packaging tape to join the Left and Right panels to the Back panel.
7. Place the Front panel, interior side face up, so that it lines up with one of the side panel edges, and join together with packaging tape.
8. Stand the cardboard panels up and arrange them so that you can now tape the remaining Front panel edge to the other side panel edge (apply the tape to the interior to hide it).
9. Fold several short pieces of packaging tape (about 10cm) into loops, sticky side out, and place strategically along the cut, top edge of the Front and Back panels. Place a roof piece so that it sticks to the tape on the Front and Back panels, sloping down from the apex so that it overhangs the side panel, and repeat on the other side.
10. Score the remaining rectangular piece of cardboard lengthways along the centre, and fold so that it forms an inverted V-shape. Place more sticky loops along the top of the roof panels where they meet in the middle, and place the inverted V-shaped cardboard so that it covers the join in the roof panels.
If you want to know how to make a cardboard box house with rooms, cut out an additional piece of cardboard measuring 1m wide by however high the front and back panels are at the point you want to add your interior wall. Cut out a door and secure the panel inside, from the Front to the Back panel, so that your child can go through the main door and crawl into the new room you’ve created.
After you’ve finished having fun, you can recycle your cardboard at your local recycling centre, or many councils will allow you to put cardboard in your standard council recycling wheelie bin. So this really is a free activity - no cost and no eco-guilt!